Thursday, June 30, 2011

Wish Big ...

Hello all and welcome to this week's challenge here at The Beary Scrap Challenge Blog!  We're doing DIY (Do It Yourself) embellishments again this week with a {fun} twist ... add red, white or blue -- I added all three colors to my card to celebrate the upcoming 4th of July Holiday in the US!!!


My DIY embellishment was so much fun to make!  I punched a large star from a snipett of Echo Park's For The Record - Advertisement Collection.   I then punched a smaller star with some cream cardstock and added some pretty Silver German Glass Glitter - yum!  I adhered the smaller, glittered star to the larger newsprint star and glued this onto a pretty seam binding bow!  I bundled up a couple 4mm Rose Buds in white with a piece of blue baker's twine and tucked this little nosegay under the star embellishment.  A sweet red and crystal trinket pin finishes off this pretty adornment!


To further embellish my pretty, patriotic card, I added a lovely little 10mm mulberry paper rose in white and some bling rhinestones from Kaisercraft!   So, there you have it ... a pretty little patriotic lovelie with a hint of vintage charm!

Thanks so much for sharing my creations here at The Beary Scrap Challenge blog during April, May and June with me!  Sadly, this is my final post and the end of my three-month Guest Designer term ... but you can rest assured I'll be back playing along with these fun challenges weekly along with all of YOU!

A big thank you to Kimm and the rest of TBS girlies for allowing to to share this special time creating with the team!  I had a blast and enjoyed every single second of my crafty time here!

Hugs,
Debbie
xoxoxoxo

Wednesday, June 29, 2011

Happy Birthday America

Do it yourself embellishments with added Red, White and Blue for
The Beary Scrap Challenge Blog
This has been a fun challenge.
Have you seen the new sister store that Kimm has created
Beary Sweet Designs?
Kimm had been creating new files like crazy and I have had the fun of getting to test some of them out, ok all of them and love it!
For this post I used two new files Apron Dress and the boys outfit coming soon to the store.


Project recipe:
Flowers made using an Embossing Tool and sprayed with Glimmer Mist

I won't have another Beary Scrap Post till after the holiday so let me just say I want to wish everyone a very happy and safe
4th of July
Happy Birthday America
and a very special THANK YOU to all the Men and Woman protecting us.

Thanks for looking
~Patricia~

Tuesday, June 28, 2011

Making Butterflies

Today I thought I would show you a fun way to make a butterfly for a card or tag. For my project, I used Graphic 45's Once Upon a Springtime. The diecut is from Donna Salazar/Spellbinders. I also added a bunch of layers of UTEE on my tag and stamped into it using a Tim Holtz stamp.


Step 1) Use score tape to cover a piece of cardstock and cut this out with your die.


Step 2) Since this is kind of thick, your center cuts won't pop out as easy. This is good, because we don't want them to at this point.

Step 3) Glue your die cut to a second piece of cardstock


Step 4) Peel away the design elements for your first color of glitter.


Step 5) Add your first glitter color and make sure it covers the areas you like.


Step 6) Add your next color (after removing the paper backing from the Scor-tape)


Step 7) Add your final color of glitter. Use a glue pen to add glue to any missing spots and reapply glitter.


Monday, June 27, 2011

Travelin' Teddy

Hi there crafty friends! Happy Monday to you. Before I chat up this week's project, I want to extend my heartfelt thanks to Guest Designer Brenda, who posted her last project this past Saturday. Sweetie, thank you so much for bringing such fun projects to our challenges. You and I have very different styles yet I learned something new from you almost every week over the last 3 months. It's been amazing to see what you design, and I am completely honest when I say you've taught me to think differently. Thanks Brenda!

This week the design team is continuing with our DIY embellishments to go along with our Do It Yourself Embellishment challenge. We're adding a little extra challenge to include red, white *or* blue, and the best I could come up with was the lovely white mulberry roses. See, Travelin' Teddy here had his own ideas about how this card was going to turn out...


For today's project I decided to make a mulberry paper "Tear Bear" as my DIY. It's been a looong time for me - at least a year! You may not know this, but Tear Bears are what brought me to The Beary Scrap in the first place. I was a novice bear maker and our very own Kimm was incredibly patient while I learned. I peppered her with a million questions and she answered every one of them with kindness. These days the Beary Sweet Designs acrylic patterns make it *so easy* to whip up a Tear Bear, and the written instructions HERE are brilliant.

I used the Tattered Teddy pattern on this card. Since Tattered Teddy came out, I've been playing around with the idea of making him slouch against a dress form die cut on a very shabby chic styled card. It turned out that my dress form die is too small for Teddy, so I went in a different direction with this project. Or rather, Teddy wanted to go in a lot of different directions and become a world traveler! (One day I will do it, but with the Baby Bear pattern instead.)

Here's Travelin' Teddy, working his way around the globe!


Card Recipe
Thanks for visiting today! Our DIY Embellishment challenge goes on through Thursday night - come play with us! You could win a $20 gift voucher to The Beary Scrap! Thursday is also the last day for Guest Designer Debbie. *sob* It's been a thrill to have both Debbie and Brenda with us for the last 3 months. I can't believe it's almost over. Ladies, thanks for all your wonderfully inspiring projects!

Cheers,
Susan

Saturday, June 25, 2011

Fond Farewell

This will be last post as a guest designer for The Beary Scrap. Before I show you all my layout, I just want to say how happy I am to have had this experience. Thank you for coming to look at my layouts and cards and thank you for giving me the privilege of being able to see all of your beautiful entries in our challenges. 


For this layout, I challenged myself to use the scraps from last week's layouts. I am sure I am not alone when I say I have a big bin of paper scraps that I can't bear to throw out but never seem to turn to them when it comes to making something. So the pile just keeps getting bigger! I figured the best plan of attack was to use them right away. 


I took my pile of scraps from the Cosmo Cricket 6x6 pads UpcycleSocial Club, and Salt Air and cut them into varying lengths, some at an angle. I didn't hesitate to use the negatives of the circles I punched or the little remaining pieces of border-punched paper. I adhered all the strips with my Pink ATG and then hand pierced a curlicue border all the way around the edges of the layout, and stitched with embroidery floss. 

Using spray mists (check out the Glimmer Mist on sale), I splattered a few inky blotches over the background.


Using Pink Paislee Artisan Tape, I made some pennants as an embellishment. I simply wrapped tape around the top of the toothpicks and then cut the ends of the tape into pennant shapes. 

Thank you so much for looking. I really look forward to seeing what sorts of embellishments you come up with! Remember, you have until 11:59 on June 30th to be entered to win a gift card to The Beary Scrap store. 

Friday, June 24, 2011

O, What a Flower!

Who knew there were so many ways to make your own flowers? I know you have seen a bunch this week and they are all fabulous! Today I have one more, very simple!, way to show you to make your own flower embellishment.

If you are like me, you have lots of letter stickers laying around that don't always get used (I know, especially those weird letters like q and x!). This is a great way to utilize some of those stickers and make a cute flower at the same time.

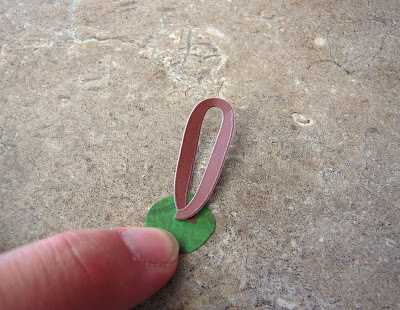
For this flower I used some letter "O"s for my flower petals. You will need a small piece of cardstock (circle or square) to anchor your petals to.


Snip one side of the O and then overlap the cut apart ends and stick it onto the small piece of cardstock.


Repeat with more O's until you have completed the petals all the way around.


Push firmly on the petal centers so they will stay (or anchor them with an extra glue dot). Then attach a button for the flower center and wa-lah! Super fast, cute and easy flower!


Now, you may be thinking-- okay, but "O" is not one of those weird leftover letters and I agree, I generally don't have a lot of "O"s left so here is one using a "w"--

On this one I didn't snip anything, just over lapped the ends of the "w" onto each other to form sort of a double petal and then stuck it on the cardstock.

And another one with a "Q"-- I always have those left! For this one I snipped it right where the little piece crosses the circle and then trimmed off the ends of that little piece, so basically it ends up looking like an "O."


Here's my completed layout with my letter flowers on it. I used Bo Bunny's Roughin' It papers for all of my circles and trimmed just a square off a diecut paper from that line to put my date and flowers on.

I hope you have learned a few tips and tricks from our DIY embellishements this week! Stayed tuned until the 30th for a few more ideas and make sure to enter your own DIY project in our current challenge.

Thursday, June 23, 2011

With Love ...

Hello everyone and welcome to this week's challenge here at The Beary Scrap Challenge Blog!  We're making DIY (Do It Yourself) goodies again this week ... {swoon}!  I adore to make my own embellies and pile them high on the paper crafting projects!   So much fun and adds such a special, personal touch!


My entire project today is a DIY - another handmade quilt block for my Art Quilt - #5!  The special DIY embellishment I added to my block is this gorgeous 3-D flower.  I  started with some lovely patterned papers from Prima's Botanical Collection and die cut 8 layers using the Tattered Florals die from Tim Holtz.  I scrumpled the layers to add dimension and give the bloom a more realistic look and added a pretty Prima Trellis Rose Lemon Creme flower to the center.


I added more blooms across the center portion of the quilt block - alternating between the Trellis Rose Lemon Cream and Trellis Rose Fontaine flowers from Prima.  I stamped the sentiment (Vintage Ornaments from WMS) and label (Holiday Labels No. 14 from WMS), then die cut, inked with some twill paint and added a couple Latte Pearls from Kaisercraft!   A few more bobbles and bits of beautiful 4" vintage lace trim, vintage buttons and twine, trinket pins in sweet yellow and aqua, a couple of glittered leaves in green, a patch of sunny yellow polka dotted fabric and some delicious seam binding that I hand tea-stained completes this yummy block!


And here is my completed Art Quilt Block ... handmade {With Love}!!
Thanks for peeking in today -- have a wonderful stampy day!

Hugs,
Debbie
xoxoxoxo

Wednesday, June 22, 2011

Tag Your It

Have you been inspired by what the girls have shown you so far in our challenge? Make your own embellishments. This has been a fun week and I have a Tag for you this week.

For my handmade embellishments I made a cute little peeker Tattered Teddy Tear Bear and added some punched out balloons. Everything was cut out with Spellbinders and Inked with Colorbox Ink. I added some Stickles to the balloons and to the the little To/From Tag. My little Tear bear was made with an Acrylic Paper Piecing Pattern and made with Mulberry Paper and Inked with Colorbox Ink. This whole tag was put together with Fabri-Tac Glue. I used some Seam Binding for the hanger at the top. My background paper is a 6x6 Paper Pad from Echo Park Summer Days. I have a cute little Pearl at the bottom to hold down the balloon strings that are dental floss.
Now lets see what you can make and enter it
---HERE---
On the Beary Scrap  Challenge Blog
Thanks for looking
~Patricia~

Tuesday, June 21, 2011

Hello!


We have a really fun challenge going on over at the Beary Scrap. We want to see you make your own embellishments. All of the DT has been trying to come up with fun ways to inspire you, so you will really want to keep checking each day to see what we've got in store for you.

This week, I decided to make a flower for you, using the Tim Holtz Tattered Florals die. What might surprise you, is what I used to make the flower. I'm sure you probably have some baby wipes lying around your studio. Well, here's something new you can try with them. Use your Glimmer Mists to color the wipes. I don't even clean up where I have colors on my mat from other projects - just lay it down, and let it absorb what's there, and then keep spritzing to completely color it.


Dry the wipes thoroughly with your heat gun (they will feel rather stiff). Then cut 3 sets of the flowers with your die. Stack the flowers, and add glue or a brad in the center. You will be surprised how much this actually feels like fabric.

Papers: Bo Bunny Timepiece, Bazzill
Alpha Stickers: Echo Park For the RecordLinkRibbon: Seam Binding Latte
Pearls: Kaisercraft
Tickets: Maya Road
Glimmer Mist: Tattered Angels
Dies: Tattered Florals
Punch: Martha Stewart
Epoxy Bubbles: Epiphany Crafts

Monday, June 20, 2011

DIY Crinoline Flower

Hello crafty friends! This week the design team is continuing with Do It Yourself Embellishment samples to go along with our current challenge. I've been a fan of crinoline flowers seen here and there and decided to try it myself!

Click for a bigger, better view!
I used Tim Holtz/Sizzix Tattered Florals die and cut three medium flowers and 2 of the smallest flowers on the die. I pressed one of each flower size into a Spun Sugar Distress Ink pad, and the others were spritzed with Glimmer Mist. It has a pink-ish brown-ish color and was perfect for the vintage look. I used a heat tool and tweezers to dry each flower then poked a hole in the centers. The flower "pollen" is a button from the My Mind's Eye Market Street button set. 


The tag is cut using the Tim Holtz Tag & Bookplate die. I used the Madison Avenue Dress Shop Glitter paper. Ages ago I cut out the dress form from this paper but never used the rest of it. Luckily I cut close enough to the form that I was able to use the sewing machine image as a design element on this tag, weeks later. Yay for pack rats!

  The twine on the faux spool is from the Madison Avenue collection, and the needle from my stash. And here's the rest of the story:

Card Recipe
Thanks so much for stopping by today. The design team will be showing all sorts of cool DIY embellishments all week, and hopefully we can inspire you to join our Beary Sweet "DIY Embellishment" Challenge. It's going on now through June 30th - come play with us!

Cheers,
Susan

Saturday, June 18, 2011

Hello, Sunshine

Hello everybody! Brenda here. It is hot here. In one sense, I feel lucky because we have perfect weather from November-May, but the rest of the months are just plain too hot. My layout today is aptly titled, "Hello, Sunshine."


The day my daughter was born was an uncharacteristically gloomy. But the moment she was born, it was as if I had my own little source of sunshine. I used the Cosmo Cricket 6x6 pads Upcycle, Social Club, and Salt Air. I inked the edges of the circles with Distress Ink in Vintage Photo. On the outer edges of the kraft paper, I used Pink Paislee Artisan Tape to create a frame of sorts.


For this week's theme of a DIY embellishment, I decided to decorate a manila tag to use as part of my title. I wrote out the word "sunshine" and then used a paper piercer to poke holes for hand stitching. After I was done stitching the title, I outlined it with more stitching in a different color floss. For my last DIY embellishment, I made a twine circle by punching out a circle from cardstock and covering it in adhesive (I used my Pink ATG). Then I knotted the end of twine and placed it in the center of the circle, twisting the twine all the way around itself until I was satisfied with the size of the circle. Then I trimmed the cardstock down and adhered my twine circle to the tag.


For an extra bit of flair, I did some random stitching with my sewing machine on two of the circles. 

Thank you so much for looking! I can't wait to see all the DIY embellishments you all come up with. I'd love to learn a few new techniques. Have a wonderful weekend!

Friday, June 17, 2011

Do It Yourself Eyelet Flowers

Happy Friday all! I have been so excited to see a couple of entries already in our Do It Yourself Embellishment challenge. I know you all have fabulous ideas out there and I can't wait to see how you create your own unique embellies so keep those entries coming!

My project for this week is this little covered notebook and matching pen-- I found it for only $1.00 at my local craft store.


My main DIY embellishment is an eyelet flower-- I saw this idea recently in PaperCrafts magazine (along with a lot of other DIYs) and was dying to try it! It was super easy to make (as long as I kept my fingers out of the way of the hot glue) and I was really pleased with the end result. If you want to try your hand at this kind of flower, here are some instructions:


1. Gather your materials--
Cardstock and circle punch (I used a 1 1/4 inch circle)
15 inches of rick-rack trim (this makes a 1 1/4 inch flower, use more if you want a bigger flower)
Glue Gun


2. Begin at the outside edge of the circle and apply hot glue around the edge, then start pressing down the rick-rack onto the hot glue, twisting it slightly to make it go around the circle. (You have to kind of twist and bend it as you go, as rick-rack does not naturally curve!)

3. Continue circle inward with hot glue and then applying the rickrack, twisting and turning to make it circle. Continue all the way into the center. Mind your fingers! I used hot glue because I like how fast it is and I'm not sure anything else would have held rickrack as it doesn't turn easily. If you used a lighter weight trim or lace I think Tacky Glue would work just fine and be less dangerous for your fingers!


4. Trim off any excess rick rack in the middle and any excess cardstock from the back circle. You'll end up with something similar to this:


Then add a brad, button or whatever you can come up with to the center for the middle of the flower. I used a brad and pierced it all the way through the cardstock circle.


A couple of other little DIY things I wanted to show you-- to make a leaf for my rick-rack flower, I punched a heart from my patterened paper and then also cut the small heart from some black lace to cover it:


I wanted to add a seam binding bow so I used white seam binding and spritzed with with Glimmer Mist to match my paper. I love how easily the seam binding can be colored and how quick it dries. After I spritzed it, I scrunched it up good and then tied the bow after it was dry.

Here's another look at my final product--


Supplies used:
Bo Bunny 6x6 paper pad-- Timepiece (sold out in the store, sorry!)
Seam Binding-- White
Tattered Angels Glimmer Mist-- Brick Red (currently on clearance at 30% off!!)
KaiserCraft Pearls-- Black
Tim Holtz Distress Ink--Black Soot
My Mind's Eye Lost & Found Union Square Brad
Glue Dots
Assorted lace trims


It's your turn-- show us your DIY embellishment and stay tuned for more DIY ideas from our Beary Sweet Design Team.

BSC #27 Winners!

We want to extend a huge "Thank You!" to everyone who played along with our June Sketch challenge! We absolutely loved visiting your blogs. Thanks so much for your support!
Our winner of the $20 gift voucher to The Beary Scrap is...

#1: Heidi

Congratulations Heidi! Please email Kimm and she'll set you up with a voucher to go shoppin'!

We would also like to congratulate our Beary Sweet Top 3:

#3 Katie Tate
#7 Crafting Cathy
#8 The Crafty Den


Ladies - thank you so much for joining us! Please take our Top 3 badge from our sidebar for your fabulous blogs!

We hope everyone checks out our Beary Sweet Sketch Challenge #28 - it's all about Do It Yourself Embellishments and is going on now through June 30th. You could win a $20 Gift Voucher to The Beary Scrap just like Heidi. Come check it out!

Cheers,
The Beary Sweet Design Team

Thursday, June 16, 2011

Dance ...

Hello all and welcome to this week's challenge here at The Beary Scrap Challenge Blog!  We're making DIY (Do It Yourself) embellishments this week and I've got a lot of DIY to share with you - wheeeeee!

Recently, I partnered up with a stampy blog friend of mine from across the miles to make an Art Quilt!  I'm having so much fun making the little blocks for my quilt ... I was a quilter before I got addicted to paper crafting!!  I adore how my blocks are coming out ... all scrappy, shabby and FUN!


So, this is block #3 out of the 16 total blocks I will have when this project is complete.  I stamped a beautiful image from Kaisercraft's Flourish Journals stamp set on beautiful Annalee patterned paper by Prima.  I cut out the image and adhered a vintage tag, a snipett of lace and a couple of Light Pink Rhinestones from Kaisercraft


The pretty bow is made from pink seam binding and I attached a heart charm at the middle. The center of the quilt block had some tea-stained twill tape and pretty little white pom-pom trim.  Above this trim I added three beautiful Snow Pearls from Kaisercraft.


After I spritzed the chipboard frame with pink and green glimmer mist and added some glitter, I adhered some 20 mm pink and white mulberry paper roses to the frame and one more in the center of the pink bloomer!  A few more bits and bobs of vintage treasures - crystal trinket pins, leaves made from glittered paper and machine sewn for contrast, a vintage doilie - complete this DIY handmade from the heart quilt block!
Thanks for peeking ... have a wonderful stampy day!

Hugs!

Debbie
xoxoxoxoxo

Related Posts with Thumbnails