Showing posts with label ColorBox Fluid Chalk. Show all posts

Wednesday, October 5, 2011

Anything Go's at The Beary Scrap

Who doesn't like an
Anything Go's Challenge.
Well for the next two weeks at
The Beary Scrap
that just what it is, and October is also Beast Cancer Awareness Month.
Kimm has created the cutest new file at 
Beary Sweet Designs
and I played around with the new
Squeak Pink file with the cutest Mice.


Are they not the most cutest mice!!
Now for more excited news about this file....

Now available on the website (Beary Sweet Designs). Squeak Pink! For the month of October, 50% off all proceeds generated from this file will be donated to the Susan G. Komen Search for a Cure.

My tag recipe:
Stickles
Also used from stash
Spellbinders, Ribbon Card Stock, Martha Stewart Leaf Punch


Thanks for looking

~Patricia~

Wednesday, September 21, 2011

The Clock Is Ticking Towards Fall

How many people love the beautiful colors of Fall?
Well our new challenge is Fall.
Use your inspiration from anything that happens this time of year or even from the colors. I choose this week to pull the colors and even a Fall theme.


I picked up this cute clock from Kaisercraft Beyond the Pages Desk Clock in the Things to Alter.The Beary Scrap Store because I thought it would be a really cute item to alter and it was. My papers are from Country Drive from Echo Park. The picture frame paper is from my stash. I added some Pumpkin Seam Binding on each end. The end opposite the clock is left open to add pictures, just untie the ribbon and add pictures and tie back up.
I used Fabri-Tac Glue to glue down the papers and a hot glue gun to add the mulberry flowers from my stash. I used Glue Dots to hold down the Seam Binding, the Glue Dots work best to hold the Seam Binding down because no glue can seep thru. I inked all the edges with Colorbox Ink and also Distressed Ink. I added some Stickles around my clock frame that I cut out with Spellbinders. I used cute leave brads for my numbers and some Red Pearls for some of my other numbers.

Now lets see what inspiration you can pull from our
Happy Fall Y' All!
Challenge and enter your project ---HERE---

Thanks for looking
~Patricia~

Wednesday, September 14, 2011

My Creepy Sketch Challenge

It's time for another look at our sketch challenge for
The Beary Scrap
This one I had a lot of fun with and I really like how it came out, OK I personally love how it came out. The challenge for the design team is to make it not Girly, well other than the flower I think its more creepy than Girly atleast thats what Im going with, lol.


Card recipe:
Other Items from stash
3D Spider, Wings, Dollie, Spellbinders Die, Stampin Up Die, Martha Stewart Punch.

Now you only have just a few hours to still enter our challenge and enter your card ---HERE---

Thanks for looking
~Patricia~

Wednesday, August 10, 2011

Sweet Little Puppy

Here is my take 2 of our sketch challenge this week at The Beary Scrap Challenges
This cute little card was requested by a customer and this weeks sketch was so fun to make last week that I knew that I wanted to do if for this card.
Card Recipe:
Mulberry Flowers from stash.
Leave flourish from Beary Sweet Designs
Bobunny Ribbon
Now lets see what you can do with our sketch challenge and enter your card
---HERE---


Thanks for looking
~Patricia~

Wednesday, May 11, 2011

The Beary Scraps Sketch Challenge Plus Embossing

Here is my card for our Sketch Challenge and the added Challenge for the Design Team --Embossing.


I used the new Bo Bunny papers from the Gabrielle Flight and I have to say I think this is my favorite paper by far, I love love love it. If you haven't seen it in person you have to get this. For my embossing I used white card stock with embossed dots and cut out with dies and added Colorbox Ink. I used the Rolling Ball Embosser from EK Sucess to shape my flowers. I also made my Tattered Teddy with an Acrylic Pattern and Mulberry Paper and also highlighted with Colorbox Ink. I put together my tear bear with Fabri-Tac Glue.
Now lets see your sketch and enter your card--HERE--
Thanks for looking.
~Patricia~

Wednesday, May 4, 2011

My Mother's Day Card Sketch Challenge

Ready for a fun Sketch from The Beary Scrap?
Well we have a good one for you on this challenge.
This is my Mother's Day Card and if could send it to Heaven this is where this card would be going.
I colored up my Simply Sassy Stamp Artistic Goddess with Copics and added Stickles to her headband and glasses. I cut my mats out with Spellbinders and added Colorbox Ink and Stickles. My paper is from Echo Park For The Record. I used some felt lace and ribbon from my stash as well as my Mulberry Flowers that yes were white and I airbrushed them with Copics to match my colors of my Simply Sassy Image.

That was so much fun to do and I think I will be doing this again. I added 4 black Pearls in the corners.
Now lets see what you can do with this sketch.

Enter your card ---HERE---
Thanks for looking.
~Patricia~

Monday, December 6, 2010

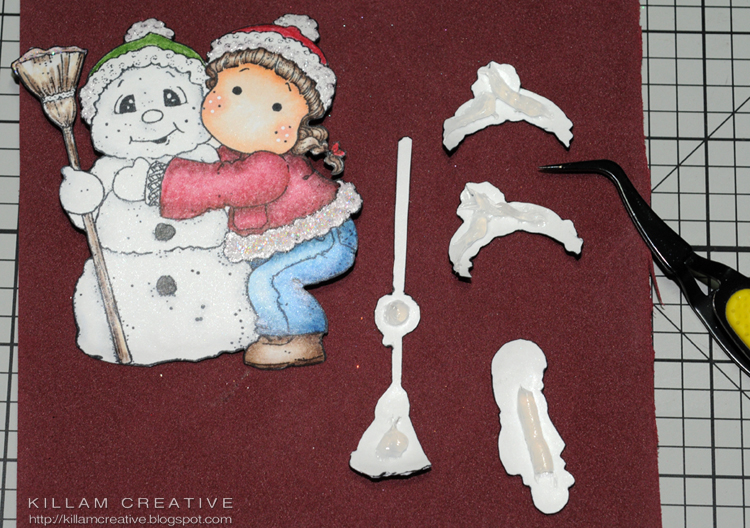
Snow Hugs and a Layering Tutorial

Hello dear friends! I hope you had a great weekend. We had a crazy busy one and as I write this Sunday night I am exhausted. (But in a good way!) As you read this Monday, it is a new day with new challenges and new crafty projects to conquer!

Today I am sharing my layering technique. It is now just about the only way I can make a stamped image "work" for me. When I look at new stamps or digital images I automatically start layering them in my mind. :)

Ok, so here is my card based on our current Beary Sweet Sketch Challenge. The design team will take it a little further this week and add die cuts to our cards. You don't have to have a die cut in your challenge entry, just be sure to follow our simple rules and enter your project by the end of the day on December 14th. You could win $20 gift voucher from The Beary Scrap!


Don't you just love these Bo Bunny "Midnight Frost" papers? Oh my goodness, I am in love! I've added loads of texture with embossing folders and used embellishments from the Midnight Frost collection. I'll add all the "card ingredient" details after the tutorial. This layering takes a lot of patience, and if you choose not to tackle it I hope you can find something useful for your projects! Thanks for looking. :)

Susan's Layering Tutorial


Step 1: Materials
  • Stamped images - I usually have 3
  • Layering plan - see the top left
    • Layer 1 - base
    • Layer 2 - clothing, hats, Snowy's buttons
    • Layer 3 - broom with handle, Tilda's left arm
  • Coloring medium - I use Copic markers and Prismacolor pencils
  • Sharp scissors - can't say enough about Cutter Bee - perfect!; also use Fiskars finger cutter and gray Helix mat for interior cuts
  • Black marker with brush tip - I love the Marvy Le Plume but haven't tried any others
  • 3D adhesive - I usually use silicone because I can control the thickness. I've also used Glue Dots with good results *and* I just learned of a new 3D adhesive that might replace my silicone. I'll let you know how it tests out when I get my hot little hands on it!
  • Round ended implement (in photo below) - can be paint brush handle or anything that has a small round end... this will make sense later. :)
  • Foam mat (in photo below) - cushions while you use the round ended implement

Step 2: Color, Cut and Edge

Left - right: Base, middle and top layers
As you can see here, I have colored,embellished and cut all my layers. It's important to let your liquid embellishments (Stickles, glossy Accents, etc) dry completely before edging with the black marker. Otherwise the marker will bleed into the Stickles or other medium you use. It's not pretty.


Carefully run the edge of the black brush marker along the edge of the image. Always come from behind because you *will* touch the image with the tip of the marker accidentally. On the back it's no big deal! The very tip of the marker will get into the small spots - just be careful to keep your pen moving; otherwise the ink will soak into the paper.

Step 4: Rounding the Edges


With gentle pressure, "draw" little circles around the edges to create a light curve. The small accessories have all been done. I have been using the round end of a paint brush handle and recently found this blue glass swizzle stick with a slightly larger ball on the end. In the Step 2 photo above, you can see both this swizzle stick and the paint brush handle; the larger ball makes smoother edges. The foam mat absorbs some of the pressure and allows for clean edges.

This Cryogen Irridescent paper shows the circles well:


Step 5: Stick 'Em Together


If you refer back to the original photo in Step 2, you'll see that my base layer is stamped on the patterned paper. We'll save that for last. Here I have squeezed out silicone on my top layers. I know how much to put on so it doesn't ooze out, but I suggest you start with the less-is-more philosophy and add more for more height as you become more familiar with it. Cleaning the oozing parts is messy and you have to be fast.

I use tweezers to apply the layers *very carefully*. You may need to put a small amount of pressure to align the parts and give the adhesive a chance to grab. I will fiddle with the pieces for a minute or two with slight pressure at all times to make sure my lines match up.

Here are those two layers. (The Cryogen paper is really reflecting the light!)


Step 6: Add the Final Layer


The layer stamped onto patterned paper includes the original snow outline at the bottom. I've filled it in with puffy snow stuff and then dotted the dry snow stuff with Stickles Star Dust. From here, you can finish the card as you like!


Thanks so much for reading through this tutorial. I hope it inspires your images to pop off the page! If you have any questions please feel free to email me. I will do my best to help you out!

Card Recipe
Wow, that's it. :) I hope this is useful to you! Hey, there's plenty of time to give this technique a whirl and enter it into our Beary Sweet Sketch Challenge. I would LOVE to see your layered projects!

Cheers,
Susan

Monday, November 15, 2010

Holly Jolly St. Nick

Hello hello blogging friends! i hope you had a spectacular weekend in your neck of the woods. Husband and I visited a dog show so we could stare at all the beautiful Dobe Boys and Girls. Ours runs more toward the Dobe Goof side of the breed family, and we love every bit of him. It is nice to see the ladies and gents, though. *wink*

Today kicks off a new Beary Sweet Challenge, and our theme is Anything Goes! Haha - I love this kind of challenge since it allows me complete freedom. Of course, this was a no-brainer for me since I started designing this card in my head waaay back when I first got my mitts on the My Mind's Eye Holly Jolly papers. With this challenge I was finally able to use it.


Santa is too delicious to be *just* a background element, don'tcha think? I had 2 of the same sheets and cut one Santa out. I painted him with Distress Crackle paint and layered him onto the second. Oh, I also I lightly inked the cut-out edges before painting with the crackle. I used Stickles on the holly and berries in his hat, too.

Here's a little note about Stickles - I have both the "Christmas Red" and "Gold" but find that "Candy Cane" and "Diamond" are much more suitable. When compared side by side, the former seem too bright.

The delightful ribbon is new to The Beary Scrap and I *love* it! I used 2 strips and wove gold embroidery thread through the centers. It was a bit of a brainstorm, and I'm really happy it hit me. I have tons of embroidery thread from years (er... decades?) ago that I've never used. Now it will be put to a good use! Yay!

The tag and tag holder thingy are Tim Holtz... stay tuned for TH products at TBS. *verybiggrin* The holly leaves (edged in Diamond Stickles) and red gems are from stash.

Card Recipe
  • Paper: My Mind's Eye Holly Jolly "Jolly Old St. Nick"; Bazzill Basics Mud Pie and (Dark Green)
  • Medium: Colorbox Fluid Chalk Ink in Chestnut Roan; Stickles in Diamond, Candy Cane, Green; Distress Crackle Paint in Rock Candy
  • Embellishments: Lace (available soon on the website); Embroidery floss, holly leaves, gems from stash
  • Adhesive: Scor-Tape, sewing machine
Thank you *so* much for visiting us today! We hope you join our Anything Goes challenge - we'd love to see your projects!

Cheers,
Susan

Monday, November 8, 2010

Sketch: Thankful For You

Hello friends! Hope you had a great weekend. We had a little family gathering to celebrate Grandma's 89th birthday. Now my wonderful in-laws are visiting and doing a little granddog sitting while Husband and I have a wee midweek fling in Philadelphia. *grin*

This week the design team is using the BSC #13 sketch with a little added challenge just for us: Apple, Pear, Pumpkin. This is open to interpretation and could be the foods themselves, their colors, or a combination of the two. Or even something I can't think of right now. :) See? It's all open to interpretation *and* imagination... 

I had a little problem at first... 'specially since I'm dying to use my new Christmas papers which have nothing to do with apples, pears or pumpkins. I poked around my paper bins and found the awesome Pink Paislee 365°. Of course, it's absolutely perfect so I opted for "sketch plus colors".


You'll notice I barely layered on this one. *gasp* I was unsure about a green dress so I figured I'd try it on the bottom layer first. (Normally I don't completely color the bottom layer - just the edges.) It turned out so well that I decided to use it.

Card Recipe
  • Stamp - Magnolia
  • Paper - Bazzill Basics in Mud Pie; Pink Paislee 365° 6x6 pad and "Be Free" (stripes) in 12x12
  • Medium - Copic E0000, E01, E11 for skin; Prismacolor pencils with OMS; Colorbox Fluid Chalk in Chestnut Roan and Creamy Brown; Stickles Crystal and Diamond; Distress Stickles in Spiced Marmalade
  • Embellishments - Kaisercraft Pearls in Snow; May Arts Crocheted Lace (brand new in store - call to order); Satin ribbon (large and woven into lace) from stash; ticket - my design and Kimm's sentiment (thanks a bunch!)
  • Tools - Scor-Pal; Cuttlebug Embossing Folders
  • Adhesives - Scor-Tape and 1/8" Glue Dots
Hope you can find inspiration from this... and while you're feeling so inspired *grin*, please join our Beary Sweet Sketch Challenge! It's going on now through November 14th. See you there!

Cheers,
Susan
Monday, October 18, 2010

I Vant To Spritz Your Paper

Hello hello! It's Monday, and you know what *that* means... It's me again, here to show off my Beary Sweet Challenge #12-inspired sample. The challenge is to use misting on your project, and I've Glimmer Mist'd the heck outta Dracula Edwin. No, it's not garlic-flavored Glimmer Mist! I'd like to keep this little cutie around for a while, but he's already spoken for. *sigh*


I did "the usual" with my pearl Glimmer Mist - spritzed the flowers (except the velvet Petaloo), black branches and vintage vampire fang tag. The best part of my misting, though, is the dry-embossed coffin - I dipped a teeny tiny paint brush into the Glimmer Mist bottle and painted the embossing! How cool is that?! I also painted Edwin's bow tie, purple cape trim and shoe strings. I really like the effect and definitely plan to use it with other mist colors.


Here is a glimpse of the easel flap. Inside is a panel for Happy Halloween greetings.


Card Recipe
Thanks for stopping in today! All week you'll find inspiration for our current Beary Sweet Challenge on "Misting". You can use any kind of misting embellishments - even handmade ones. Come join us for your chance at a $20 gift voucher to The Beary Scrap!

Cheers,
Susan

Friday, October 15, 2010

Mist 'Em Up, Cowgirl!

Welcome to our new challenge-- Glimmer Mist! And this was a challenge for me as it is a fairly new technique for me to be using. I hope you will take the challenge sometime within the next two weeks and take a bottle of Glimmer Mist (GM) to some of your projects.

To start with this week, I used GM on a few simple aspects of my layout. I know this picture is a bit hard to see since I used light paper and a light colored mist, but hopefully you get the idea. I spritzed Creme de Cocoa GM over some stars that I cut out with my Sizzix. Then I carefully removed the stars and ended up with this:


The Creme de Cocoa mist is sooooooooooooo pretty! It is a real light brown with a little bit of a gold sheen to it, though when I sprayed it on some of my embellishments, like the blue stars and brown tag below, it took on almost a coppery color.


I particularly like the GM on the dark brown tag and star, it really stands out and adds just a little extra to my page.


I used the Cowboy paper from My Mind's Eye Lost & Found Portobello Road, matching the theme of that paper to my old fashioned cowgirl pictures of my daughter and I. The whole thing is mounted on Bo Bunny Double Dot Cardstock, though I used the reverse side without the dots, and inked with Colorbox brown ink.

Now it's your turn to get out the mist bottle and mist 'em up! We can't wait to see your creations so make sure you add a link to our challenge by Oct. 31 11:59 EST for your chance to win a great prize from The Beary Scrap!

Monday, October 4, 2010

Boo!

Hello hello dear friends, and happy October to ya! It got cooold this weekend and was a bit of a surprise. I *knew* it was going to get cold, but I forgot how October can be here. That's what sweaters are for, though. I love a warm cozy sweater!

This week the design team is bringing you projects created with a Halloween theme. Click HERE for the current Beary Sweet Sketch Challenge - it's a fun one!

The most important thing I can tell you about my card is this: It kicked my butt! Haha! I've been admiring stamp-free cards lately, and decided to give it a go myself. Honestly, it felt a little like my very early card-making days... and it was uncomfortable. BUT I stepped out of my current style box and tried something different, about which I'm very happy. I used a ton of "product" and still let the paper tell the story. I like that.


The card is a combination of Cosmo Cricket's Haunted (in-store only) and My Mind's Eye "Halloween Wishes". I've gone and used black card stock as my base once again... it's a trend!


This swirl is part of Pink Paislee's Artisan Elements pack. They are paintable swirls and bits that you can spritz or paint to match your project. Love! I dripped a little Black Soot Distress Ink onto the swirl and tilted it around until it covered the whole element. It took a long time to dry, but it was worth the wait!

The cream and black diamond paper was embossed with a Cuttlebug folder and randomly inked with Charcoal chalk ink to give the hint of dark. I decided it needed more, so I sprayed (too much?) Pearl Glimmer Mist all over. If I planned this out, I would have sprayed with GM *then* embossed and inked. I was worried that I would lose my embossing when the paper was wet... luckily, no. Phew!


"Boo" started out as unfinished die cut letters. I dripped slate alcohol ink (the closest to black I have) on each letter to give it a dark base and set it aside to dry. Once it was ready, I layered black Stickles to cover completely and set aside once again. It's very sparkly!

Card Recipe
Tomorrow Gini will haunt these pages, so please come back!

Cheers,
Susan


Our current Beary Sweet Challenge can be found here.


Isn't this a fun sketch? Come join us! You could win a $20 gift voucher to The Beary Scrap!
Related Posts with Thumbnails