Showing posts with label Scor-Tape. Show all posts

Tuesday, August 23, 2011

Send Fall My Way!


Hi! It's Gini back with another round of tic-tac-toe. For today's card, I have played it across the top row with Lace, Distress and Glitter. I am so excited that fall is just around the corner, so to get ready for the season, I made a pumpkin card. I'm in love with the Authentique papers, and used the Glowing Collection. It's a really gorgeous set of papers. My pumpkin is a die-cut from CottageCutz' Spooky Treats. After I cut it out, I shaded the edges and the details with Distress Ink. Next, I added a thick layer of Crystal Lacquer. I sprinkled a little glitter on the pumpkin, while it was still wet. I used Scor-tape to add my lace (it's the easiest, non-messy way to add your ribbons and lace!)

So how about you....? Are you longing for fall to get here, or are you clinging to the last bit of summer?

Sunday, August 21, 2011

A Tweet Mini Album

Hello crafty friends! This week the design team continues with our Tic-Tac-Toe challenge. This has been the most fun!

For the longest time I eyed up the Prima Build-A-Book albums (40% off right now!) and wondered if I should take one on. Could I do it? Would I have the patience to complete all the pages? I didn't know... until one day I decided to take the plunge. I could do it! Why not? I'm a crafty sort of gal, right? It's only 8 surfaces to design and cover, and I had confidence.

I received it and it sat on a shelf for weeks. I told myself I didn't have the right paper collection for it. Really, I was chickening out. Haha! Luckily, Echo Park's Victoria Gardens came along and I knew it was the perfect collection to use on this album.

For this challenge I've used lace, dry embossing and pearls. I have the cover completed and the inside pages will follow in the next few weeks. I'm so happy that I've finally started this album and am ready to plan another one. Can you believe it?


If you saw my message on Facebook last week, you might recognize the teal flower. I used the Retro punches to punch out 3 large and medium flowers, spritzed with water and scrunched up. After they dried a little I carefully opened them back up and glued the layers together. Once they dried completely, the tips were tinged with Vintage Photo Distress Ink and Star Dust Stickles. It's not bad for a first try *wink*. I think I'll work on lighter card stock and use more Distress Inks to color them in.There are so many possibilities! The large Retro punch is currently out-of-stock, but you can easily achieve the same kind of results with the medium and large Daisy punches. The daisy's pointy tips would work perfectly - have fun with it!


The "Today I wish you..." banner is from the Victoria Gardens Elements Stickers sheet. I cut it out -backing and all- and used Scor-Tape on the left and right edges to elevate it over the crochet lace.


Card Recipe
Thanks for visiting today! I hope you will consider joining our Tic-Tac-Toe challenge - check out all the fun 3-in-a-row combinations you could use on your project:

Click the pic for all the challenge details!
Cheers,
Susan

Tuesday, July 19, 2011

Favorite Blue Jeans


Hi! It's Gini with my new card for the Beary Scrap, and I have to admit, this challenge was my idea. Look in your closet and find some inspiration for your project, from one of your favorite things to wear. This can be clothes, jewelry, accessories - you name it! If you can wear it, let it be your inspiration.

I love embellished jeans, so I added a ribbon of old denim, with a strip of paper, and Dew Drops over it. I adhered the denim with Scor-tape which held it perfectly. The papers are from Prima's Sweet Fairy line, (including the cute tickets that I cut from one of the pages.) The stamps/dies are from Prickley Pear.

Monday, May 23, 2011

Nature Is Calling!

Hello hello and happy Monday to you! I hope you had a wonderful weekend. I had a birthday... and it was good. *wink*

So, this is Week 2 of our Beary Sweet Nature Challenge, where you can enter any project that you think conjures up "nature" in your noggin. As a bonus challenge to the design team, we have to include a charm in our project. Easy enough!

Kimm just got this fun filmstrip ribbon into the store, and I decided to use that as my jumping-off point. Here's what happened when it all landed:


Card Recipe
Thanks for visiting today! Come back all week for more great design team samples of our Nature theme. I hope you can enter our Beary Sweet Nature challenge, too. You could win a $20 voucher from The Beary Scrap!

Cheers,
Susan

Monday, May 9, 2011

A Frame Inside A Sketch!

Hello hello and happy Monday to you! We're smack dab in the middle of our May sketch challenge and the design team is bringing more samples to tickle your fancy and get your creative juices flowing. This week we're adding a little extra design team challenge - embossing.

A friend wants a set of frame cards as gifts for a wedding shower. One for the bride and one for the bride's mom. How nice!


The wedding colors include a teal-ish blue, so I went with the deliciously muted tones of papers from the Prima Botanical 6x6 stack. The lace-covered frame has an opening at the top for the photo.

My embossing was done with folders - the dots give the blank "pre-photo" area a little interest, and the embossed swirl above the flower mirror the pearly swirls.


It's hard to see in this photo, but the easel panel on the bottom has the same swirl embossing as the front.

Card Recipe

Paper: Prima Botanical 6x6 stack; Bazzill Basics Truffle and Avalanche
Medium: Distress Ink in Vintage Photo; Distress Stickles in Star Dust
Embellishments: (3)Kaisercraft Pearls in Snow; Flower, lace, pearl swirls from stash
Adhesive: Scor-tape; EK Success 3D Foam Dots in 1/8" and 1/16"

Thanks for visiting - check back all week for great samples from our design team! There's still time to enter your project using our Beary Sweet sketch - you could win a $20 gift voucher to The Beary Scrap!

Cheers,
Susan

Tuesday, February 22, 2011

Shimmer and Shine those Winter Blues Away


Hi, it Gini here ready to share another way to beat thoseIwinter blues! Flowers and springtime colors and lots of sparkle- yay!

I made a never-ending card (which is so fun- it just keeps opening, and opening and opening!) If you have never made one of these, there is a great video tutorial at Creations by Christie. I used the Graphic 45 Once Upon A Springtime paper, tons of vintage German Glass Glitter, and stamps from Heartfelt Creations - all things that I love!

Here is what the front of the card looks like...


And then you open it and see this view....


And then this view...


And finally this one - after this is goes back to the beginning.


This card would have been pretty, but when I added all of the German Glass Glitter, it became a wow card!

I know some of you are wondering what adhesive to use with this glitter.... You can use all kinds of different things, but, you will get different effects. I experimented a little with some of the glues that I had around the studio and thought I would share what I found.

Fabri-tac glue: one of my favorite glues - It will work with this glitter, but doesn't give you much control. That could be good if you wanted a random type effect.


Flower Soft glue (or Aleene's tacky glue): This gives you a rather 3-d effect as the glue dries without spreading out. You can't really get fine detail effects, but if you want chunky, with lots of dimension, this is great.


Scor-tape: This is easy and quick with no drying time. Perfect if you want very uniform borders. You can also get sheets of Scor-tape, and cut with your die-cut machines to make a very glittery embellishment.


Art Glitter Glue Dries Clear (there is also a dries white version) with the fine metal tip applicator: This is a much runnier glue, which allows you to use the metal tip that will dispense the finest lines of glue that you can imagine. This will let you take a stamped image , and trace around the areas that you would like to highlight and add your glitter.


Another great thing that I've found when using this glitter is that it's not as messy - there is no static cling to the glass, so it goes right back in it's container when I'm finished. And the sparkle does not even compare to your normal plastic glitter. Once you try this, you will end up wanting it in every color (I think I have almost all of them now!)

Remember, you still have about a week and a half to get your entries in for our Guest Designers!

Tuesday, January 18, 2011

Gini's Friendship card


Hi, It's Gini here to share with you my first Friendship/Love themed card. Since that's our theme, you know I had to use Echo Park's Be Mine collection. I think by now, I am their's - LOL! The stamp is from JustRite Stampers and was colored with Copics and inked with Worn Lipstick Distress ink. I sewed some button hole trim on canvas and colored it with Glimmer Mist. I made my paper ruffle by scoring (on my Scor-pal) every half inch on black cardstock, gluing ribbon along one edge with Scor- tape and then pleating it.

Thanks for looking - you have until January 31st to play along.

Monday, January 10, 2011

Tag, You're It

Hello friends! I hope you had a swell weekend. I'm not really sure what we did... oh, right... took down the Christmas trees and decorations and stored 'em away for another year. Post Christmas shopping found a great ornament organizer that now hold scads of glass ornaments without a single piece of tissue wrap. Yay! Besides carrying the bins from the attic to the first floor, the "job" we hated the most was unwrapping (and rewrapping) all those darn keepsakes. Now we can decorate directly from the trays and have more time for eggnog. *wink*

This week the design team will show you new interpretations of our BSC #17 Sketch Challenge. We're also adding a "new" element to our projects:

Sketch Plus Something New 

Everyone who comes to see my newest colored Magnolias will think I've fallen off my rocker this week. I'm OK, really! I've always been a fan of collage style and especially like what Tim Holtz has to offer our crafty community. I'm hugely inspired by vintage - be it ephemera or textiles, new or reproduction, I'm all over it. You might have seen oversized tags on blogs throughout the internet over the Christmas season - mostly inspired by the very same Tim Holtz. With this project I've dipped my toe in the water. My "new" is a tag shape made with a new Tim Holtz die!


Kinda cool, no? All of the papers are My Mind's Eye Union Square, from the beautiful and brilliant "Lost and Found" series.The "Home is a Little Slice of Heaven" die cut is from the Union Square accessory sheet. The pointing hand brad is from the same line (although the brad pack is currently sold out - sorry!).

I have to share a happy accident. The tag was assembled with Frosted Lace Stickles on the top flourish. I decided it needed to be a little flashier and added a layer of Platinum Stickles and used a heat gun to dry it. Little did I know that the heat gun was also doing interesting things to the Bazzill tulle! It curled edges and made much of the tulle wavy - luckily I caught it before it burned the edges brown. I like the tattered effect!


This was a really simple project to conceive, and agonizing to finish. I'm still thinking I need to balance the glitter swirl on the top with a touch of the same on the bottom. What do you think? I'm open to suggestions!

Card Recipe
  • Paper - My Mind's Eye Lost and Found, Union Square line: "Home Sweet Home" tag paper; "Favorite"- red circle layer and embossed layer under the "home" die cut
  • Medium - Distress Ink in Walnut; Stickles; Glimmer Mist in Suede - spritzed the red and ivory corner tulle bits to "dirty them up"
  • Embellishments - MME Lost and Found, Union Square line: Glittered Accessory Sheet; Bazzill Basics Tulle (in stock but not on the site - email Kimm for more info if you would like to get some in your hot little hands); metal bits from my stash; vintage tatting lace from my much-coveted stash
  • Adhesive - Scor-Tape; 1/2" Glue Dots; Fabri-Tac
That's it for me! Please come back throughout the week to see new samples for our sketch challenge by all the fabulous design team. You can get all the details and enter your own creation by clicking on the sketch below. You could win a $20 gift voucher from the Beary Scrap! 


Cheers,
Susan

Monday, December 6, 2010

Snow Hugs and a Layering Tutorial

Hello dear friends! I hope you had a great weekend. We had a crazy busy one and as I write this Sunday night I am exhausted. (But in a good way!) As you read this Monday, it is a new day with new challenges and new crafty projects to conquer!

Today I am sharing my layering technique. It is now just about the only way I can make a stamped image "work" for me. When I look at new stamps or digital images I automatically start layering them in my mind. :)

Ok, so here is my card based on our current Beary Sweet Sketch Challenge. The design team will take it a little further this week and add die cuts to our cards. You don't have to have a die cut in your challenge entry, just be sure to follow our simple rules and enter your project by the end of the day on December 14th. You could win $20 gift voucher from The Beary Scrap!


Don't you just love these Bo Bunny "Midnight Frost" papers? Oh my goodness, I am in love! I've added loads of texture with embossing folders and used embellishments from the Midnight Frost collection. I'll add all the "card ingredient" details after the tutorial. This layering takes a lot of patience, and if you choose not to tackle it I hope you can find something useful for your projects! Thanks for looking. :)

Susan's Layering Tutorial


Step 1: Materials
  • Stamped images - I usually have 3
  • Layering plan - see the top left
    • Layer 1 - base
    • Layer 2 - clothing, hats, Snowy's buttons
    • Layer 3 - broom with handle, Tilda's left arm
  • Coloring medium - I use Copic markers and Prismacolor pencils
  • Sharp scissors - can't say enough about Cutter Bee - perfect!; also use Fiskars finger cutter and gray Helix mat for interior cuts
  • Black marker with brush tip - I love the Marvy Le Plume but haven't tried any others
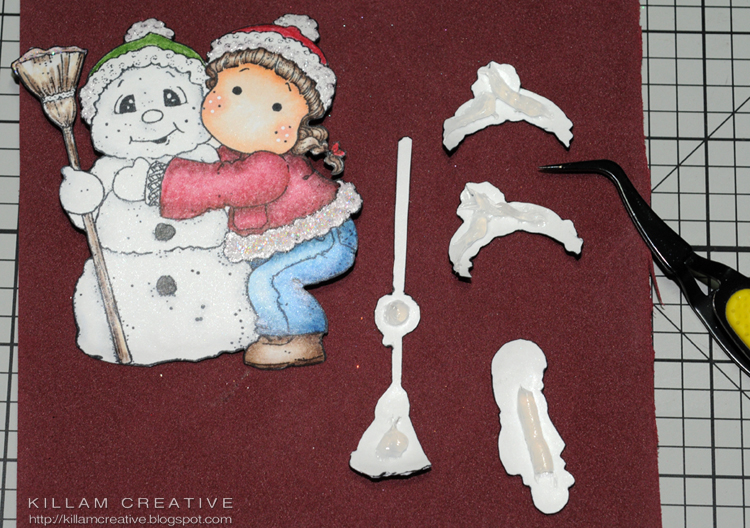
  • 3D adhesive - I usually use silicone because I can control the thickness. I've also used Glue Dots with good results *and* I just learned of a new 3D adhesive that might replace my silicone. I'll let you know how it tests out when I get my hot little hands on it!
  • Round ended implement (in photo below) - can be paint brush handle or anything that has a small round end... this will make sense later. :)
  • Foam mat (in photo below) - cushions while you use the round ended implement

Step 2: Color, Cut and Edge

Left - right: Base, middle and top layers
As you can see here, I have colored,embellished and cut all my layers. It's important to let your liquid embellishments (Stickles, glossy Accents, etc) dry completely before edging with the black marker. Otherwise the marker will bleed into the Stickles or other medium you use. It's not pretty.


Carefully run the edge of the black brush marker along the edge of the image. Always come from behind because you *will* touch the image with the tip of the marker accidentally. On the back it's no big deal! The very tip of the marker will get into the small spots - just be careful to keep your pen moving; otherwise the ink will soak into the paper.

Step 4: Rounding the Edges


With gentle pressure, "draw" little circles around the edges to create a light curve. The small accessories have all been done. I have been using the round end of a paint brush handle and recently found this blue glass swizzle stick with a slightly larger ball on the end. In the Step 2 photo above, you can see both this swizzle stick and the paint brush handle; the larger ball makes smoother edges. The foam mat absorbs some of the pressure and allows for clean edges.

This Cryogen Irridescent paper shows the circles well:


Step 5: Stick 'Em Together


If you refer back to the original photo in Step 2, you'll see that my base layer is stamped on the patterned paper. We'll save that for last. Here I have squeezed out silicone on my top layers. I know how much to put on so it doesn't ooze out, but I suggest you start with the less-is-more philosophy and add more for more height as you become more familiar with it. Cleaning the oozing parts is messy and you have to be fast.

I use tweezers to apply the layers *very carefully*. You may need to put a small amount of pressure to align the parts and give the adhesive a chance to grab. I will fiddle with the pieces for a minute or two with slight pressure at all times to make sure my lines match up.

Here are those two layers. (The Cryogen paper is really reflecting the light!)


Step 6: Add the Final Layer


The layer stamped onto patterned paper includes the original snow outline at the bottom. I've filled it in with puffy snow stuff and then dotted the dry snow stuff with Stickles Star Dust. From here, you can finish the card as you like!


Thanks so much for reading through this tutorial. I hope it inspires your images to pop off the page! If you have any questions please feel free to email me. I will do my best to help you out!

Card Recipe
Wow, that's it. :) I hope this is useful to you! Hey, there's plenty of time to give this technique a whirl and enter it into our Beary Sweet Sketch Challenge. I would LOVE to see your layered projects!

Cheers,
Susan
Related Posts with Thumbnails