Showing posts with label Bazzill. Show all posts

Monday, September 12, 2011

A Sketch and A Snake-Oil Salesman (Updated!)

Hi folks! Happy Monday to you. I hope you had a nice weekend. Husband and I took a train up to NewYork to see a Broadway show. I love New York and all the hustle and bustle. I'm not going to take up your crafty time talking about the 9/11 anniversary, but I want to share one little experience with you.

As we sat in Penn Station to come home Sunday morning we could hear a pipe and drum band marching by outside. It was 8:35am and up until that moment the Amtrak station was full of the normal buzz. One by one, I could see the recognition of that sound dawn on my fellow travelers. I don't believe there is a sound more profound than a bagpipe, and a band can tear at the fibers of your heart while celebrating life, love and liberty. (Ok, I'm Scottish... can you tell?) The train station fell silent for a bit as we listened. It was a rare, truly poignant moment.

So this week the design team is wrapping up our September sketch challenge and late in the week Lori and Jamie will ring in an oh-so-timely theme challenge. As a way to spice up our final sketch samples Gini, Patricia and I are including our favorite embellishments. How easy is that?


Update: I added swirls of the Prima Say it in Crystals black rhinestones - love the effect!


I've used 3 favorites on today's card: lace, sewing and decorative pins! Haha - why chose just one when there are so many? The papers are from Authentique's "Glowing" 6x6 pad, and the image is one of my favorite vintage finds. The skeleton is a bit of a snake-oil salesman, isn't he? I have a whole collection of these Antikamnia Chemical Company calendar images (in full-color; black & white seemed perfect for this card, though). They really are quite amazing!


Card Recipe
Thanks so much for visiting today! There is still plenty of time to get your September sketch challenge project entered (by midnight EDT Wednesday) - you might win a $20 gift voucher to The Beary Scrap!

Cheers,
Susan

Monday, September 5, 2011

Spooky September Sketch

Hello hello my pretties... It's Monday and time for another project from me! Happy Labor Day to all my US friends. I hope you can relax today!

This week the design team is continuing with samples --and perhaps a little inspiration! -- for our brand spankin' new Beary Sweet sketch challenge. I got a little witchy with Authentique's "Glowing" 6x6 pad.


I used 4 different designs from the pack, including the polka dot spider. I stamped the sentiment onto scraps created by one of the layers. The stamps are individual letters that I laid out askew for a fun, messy effect. Actually, that's a lot about this that's distressing, including the chewed edges, sewing lines all over the place and pulled edges of the lace and tulle.

I have to give big props to Lori for inspiring me to make my own rosette for the very first time! Her card last week featured a rosette and I whined a bit about not having a rosette die. She pshaw'd me and showed me the way with a strip of paper and a handy dandy Scor-Pal. We don't need no stinkin' rosette dies! Thanks, Lori! We'll share a tutorial on it soon. :)

I was thinking of just using "tea party" and reveling in the double entendre, but decided to steer it in a less *ahem* political direction. The off-white threads behind the top text is a bit of cheese cloth.


Inside includes a ton of space for a spooky sentiment as well as more lace and a fun diamond pattern design from the stack. 

Card Recipe
  • Image: vintage image found online and spiced up for a lush print
  • Paper: Authentique "Glowing" 6x6 paper pad; vintage witches printed on ivory Canson Mi-Tiente paper (I love the texture for vintage images); Bazzill basics in black and orange; Rosette is made from a random strip of paper found in my stash
  • Medium: Stickles Diamond on spider; Ranger Distress Ink in black and vintage photo on edges
  • Embellishments: Hand made rosette; Kaisercraft black pearls; lace, cheese cloth and mirrored bird from stash
  • Adhesives: Scor-Tape and Fabri-Tac 

Thanks so much for visiting today! We'd love to see what you can create using our September sketch - you could win a $20 gift voucher from The Beary Scrap!

Cheers,
Susan

Monday, July 18, 2011

Closet Inspiration

Happy Monday to all our crafty friends! This week the design team is showing you new inspiration for our current "Find Inspiration In Your Closet" challenge. When I stood in my closet I was struck by how... er ... boring my wardrobe is these days. I wear a lot of black and khaki and don't go in for the fun and funky detailing you see on a lot of fashion these days. In lieu of the fancy stuff and avoiding the flowery knickers in my girly drawer (for your sake, really), I decided to love all over my purple and green plaid linen bathrobe. Hey! It's not as dorky as it sounds!

Click for a bigger view!
I adore Prima floral papers and was happy to find a few that coordinate with the ol' cover-up. :) The bird and cage were made using a Tim Holtz/Sizzix die. The bird from a scrap of Prima paper and the cage from really thin cherry wood paper.

Card Recipe
Thanks for visiting today! Please join our current challenge - you could win a $20 gift voucher from The Beary Scrap!

Cheers,
Susan

Monday, July 11, 2011

Happy Birthday!

Hey there crafty folks! I hope you had a great weekend. This week the Beary Scrap design team is showing more samples for our current Sketch Challenge & Blog Candy. On Thursday our next Guest Designer is sharing her first project with us. I can't wait to see what Lori Leng of Pinkcloud Scrappers will show us first! At the end of the week Jamie will usher in a new challenge and we will announce our winners on Sunday the 17th. We have a busy week in store for you!

I've gone whimsical and cute for this week's project. I knew I wanted to color my new Balloon Kaylee stamp and went poking through my papers to find a good match. Lo and behold I found the cutest My Mind's Eye Alphabet Soup papers. I forgot I had them!

Click the pic for a larger view
I combined 2 lines from My Mind's Eye - Alphabet Soup for the papers and Tickled Pink for the ric-rac and brad inside the big flower. I love how these 2 lines coordinate!

Kaylee is layered and I'm still decided whether to use Star Dust Stickles on either the headband or balloon. It seems needed up there, but I'm not sure which to do. What do you think?

Oh, and the "Happy Birthday" stamp included with Kaylee will go on the inside panel.

Card Recipe
Click to go to the challenge!
Blog Candy - every challenge entry is eligible to win!
That's it for me! I hope to see you at our challenge, going on through Thursday night!

Cheers,
Susan

Monday, June 6, 2011

Sketchy Dragonfly

Hello crafty friends! It's another Monday - oh, how does the weekend go so fast? It was a beautiful one here, and we took advantage and trimmed trees and weeded. I hated the work but love the results!

This week the design team is showing samples using our current Beary Sweet Sketch Challenge. We're adding a little extra element to our projects in the form of seam binding.

Here's my take on the sketch. I wasn't sure about the sketch at first, but fell in love with it as I pulled the Bo Bunny Vicky B papers together. There are so many wonderful designs in this 6x6 paper stack that I had no problem at all. I adore these colors!


I used the wooden dragonfly from Pink Paislee's Butterfly Garden collection (currently sold out in the store - sorry!). I gave it a base coat of pearly white and pink acrylic paints and then painted the body and part of the wings with glue, then sprinkled copper German Glass Glitter. On the wing tips I used the German Glass Glitter in white, with an itty bitty bit of Star Dust Stickles on the very ends.

The pink brads are from My Mind's Eye Madison Ave and the green swirl brad in the flower is from the We R Memory Keepers "Inspiration" Eyelet & Snap set. 

The mulberry paper roses were spritzed with a light green Glimmer Mist and touched with Star Dust Stickles. The  crocheted flower is an Etsy find and the decorative pins are my own design.


Card Recipe
Thanks for visiting today. I really hope you can join our Beary Sweet Sketch Challenge, going on now through June 14th. Come play with us and you could win a $20 gift voucher!

Cheers,
Susan

Monday, May 23, 2011

Nature Is Calling!

Hello hello and happy Monday to you! I hope you had a wonderful weekend. I had a birthday... and it was good. *wink*

So, this is Week 2 of our Beary Sweet Nature Challenge, where you can enter any project that you think conjures up "nature" in your noggin. As a bonus challenge to the design team, we have to include a charm in our project. Easy enough!

Kimm just got this fun filmstrip ribbon into the store, and I decided to use that as my jumping-off point. Here's what happened when it all landed:


Card Recipe
Thanks for visiting today! Come back all week for more great design team samples of our Nature theme. I hope you can enter our Beary Sweet Nature challenge, too. You could win a $20 voucher from The Beary Scrap!

Cheers,
Susan

Monday, May 9, 2011

A Frame Inside A Sketch!

Hello hello and happy Monday to you! We're smack dab in the middle of our May sketch challenge and the design team is bringing more samples to tickle your fancy and get your creative juices flowing. This week we're adding a little extra design team challenge - embossing.

A friend wants a set of frame cards as gifts for a wedding shower. One for the bride and one for the bride's mom. How nice!


The wedding colors include a teal-ish blue, so I went with the deliciously muted tones of papers from the Prima Botanical 6x6 stack. The lace-covered frame has an opening at the top for the photo.

My embossing was done with folders - the dots give the blank "pre-photo" area a little interest, and the embossed swirl above the flower mirror the pearly swirls.


It's hard to see in this photo, but the easel panel on the bottom has the same swirl embossing as the front.

Card Recipe

Paper: Prima Botanical 6x6 stack; Bazzill Basics Truffle and Avalanche
Medium: Distress Ink in Vintage Photo; Distress Stickles in Star Dust
Embellishments: (3)Kaisercraft Pearls in Snow; Flower, lace, pearl swirls from stash
Adhesive: Scor-tape; EK Success 3D Foam Dots in 1/8" and 1/16"

Thanks for visiting - check back all week for great samples from our design team! There's still time to enter your project using our Beary Sweet sketch - you could win a $20 gift voucher to The Beary Scrap!

Cheers,
Susan

Monday, May 2, 2011

Tilda Jumps for Joy!

Hello crafty friends! It's Monday after a busy gardening weekend, which means I'm feeling achy but good after all that weeding. Phew! Who knew some weeds just don't die over the winter? I've got this wicked grassy stuff that sends out runners and .... oh my, you don't need to hear about my herb bed woes. Let's take a look at my card for this week, then! *So* much more fun.

We have a new sketch challenge for you, and I was inspired to color up a Magnolia stamp. I *know*! It's been a long time, but Tilda doesn't seem to be bothered - she's jumping for joy!


I layered her up and used copious amounts of Star Dust Stickles. The papers are the fun and springy Old World Cabbage Stew from Jillibean Soup. The butterflies are vintage images printed and cut out - I added wire antennae and Stickles for a little more detail. The pins are homemade.

Our Beary Sweet Sketch challenge goes on through May 14 - we'd love to see your entries based on this sketch. C'mon over and play!


Card Recipe
Thanks for visiting today! Be sure to check back all week for more fabulous BSC#25 Sketch Challenge samples from our oh-so-talented design team!

Cheers,
Susan

Monday, April 18, 2011

Butterfly Garden

Hey there crafty folks! I hope you had a great weekend. Can you believe it's Monday already? *sheesh* This week the design team is fluttering around with a "Wings" theme. As you know, our Beary Sweet challenge is going on right now with the very same "Wings" theme! What a coincidence... :)

Last week Patricia used Colorbox chalk ink on her Pink Paislee butterfly wood shape with great success. For my project today I decided to get out the acrylic paints and see what would happen.

Click to make bigger!
Hee hee, I can't say I totally love it, but it's not bad.  I painted the russet color then used a dry brush to swish the lighter, orange-y color on the center parts. The swirls are made from Ranger's Liquid Pearls and a not-so-steady hand. Honestly, I can't draw a stick figure standing straight. *sigh*

The paper is Pink Paislee's Butterfly Garden 12x12 sheet of "Flower Blooms". I cut is specifically to show the bumble bee and clock along the right edge. One of the things I really like about these decorated 12x12's is how I can pick and choose what section to use. The inside layers are also from the same sheet, but different sections and different 'scenes'. I'll add photos of the inside once it's completed. As the card came together I ended up putting the seam binding/calendar grouping on the right instead of the planned left corner. It covered the bumble bee but made more sense with the other elements.


The Beary Scrap will have loads of seam binding on the shelves soon - I can't wait for all the yummy colors!  It's all wrapped up with a button from My Mind's Eye/Lost & Found/Madison Avenue. The pin is made from my supplies. I spritzed some of the mulberry roses with Vanilla Breeze Glimmer Mist. The grungeboard swirls were colored with distress stain and then spritzed with the same Glimmer Mist.

The calendar is a digital print and interchangeable with other months - I didn't attach it because I'm not sure how it will be used. I'm partial to May, though, since I celebrate my birthday all month.

You think I'm kidding, don't you?

I wanted to show you the layering that can be done with Distress inks and a Ranger Blending Tool. Here's a photo of the three blending stages:

Click for a larger version
Ok, maybe it's really only two stages! First I used green Peeled Paint on the edge and toward the middle a little, then used Vintage Photo on the edge only. Adding the Vintage Photo gives it a little more depth and a  vintage feel!

Card Recipe

Paper: Pink Paislee Butterfly Garden 12x12 - Flower Blooms and Botanical Gardens (pink middle layer); Bazzill Basics
Medium: Distress Inks in Peeled Paint, Vintage Photo, Tattered Rose; Glimmer Mist Vanilla Breeze; Distress Stickles in Peeled Paint; Stickles Star Dust; acrylic paint; Distress Stain Vintage Photo
Embellishments: Button from MME Madison Avenue; Mulberry Paper Roses; seam binding (in the store soon!); Kaisercraft Pearls
Adhesives: 1/4" Scor-Tape; Fabri-Tac
Tools: Scor-Pal; Ranger Blending Tool; Honey Bee Scissors

That's it for me. Thanks for visiting today, and remember to enter your "Wings" project in our challenge HERE by April 30th. Good luck!

Cheers,
Susan

Monday, February 21, 2011

Baby It's Cold Outside

Hello dear friends and happy Monday! This week the Beary Scrappy Gals are continuing to show samples using our current challenge theme. We're adding a little extra, too!


Lately I've been focusing on embellishments that match the paper line. On my last two cards I used elements cut out from the 12x12 papers. For this card I looked no further than the wonderfully coordinating embellishment packs made for Bo Bunny's Midnight Frost line. 


This was a quick card - everything fell into place at lighting speed. With these fabulous chipboard embellishments I was able to add my sparkle (with a little extra thanks to Stickles on the swoosh) easily. Both the blue ribbon and white lace are Midnight Frost Wraps - see the sparkle on the lace? Yea, it came like that! Yay!

On the inside I plan to use a sentiment along the lines of "Baby it's cold outside... let's snuggle". Hmm, sounds kind of silly when I write it out... any suggestions on better wording?


I used Crystal Stickles on the swooshes to enhance their sparkliness. They were already this green-y color but I kicked it up a notch. No enhancement necessary on the "Brr" - it's great as is!


The base card stock is Bazzill Basics - have you seen that all Bazzill is on clearance? 50% to move it all out and make room for new and exciting STUFF!

Don't forget we still have our Guest Designer Call going on through March 5th. We know you're all busy making projects using our GD sketch and we can't wait to see 'em!

Cheers,
Susan


Monday, January 17, 2011

The 411 on Love

Please scroll down for our BSC #17 winners - thanks everyone!


Hello hello and Happy Monday! We're off on a new challenge here at The Beary Scrap DT and Challenge blog. Our theme for this challenge is

Since Husband and I love each other dearly but *don't* observe Valentine's Day, I started out with a friendship theme. As things happen, this card took on a life of it's own and I've fallen in love with it. *grin*


The flower... oh the flower! Don't you just love it? I used Patricia's video tutorial for my flower and made it using Basic Grey's Curio paper. (The flower is the large template.) I can't wait to try it with grungepaper. Check it out HERE at her blog! Thanks so much Patricia for putting together such a wonderfully detailed tutorial.


The "Things I Love" layer is a card stock embellishment from the My Mind's Eye/Laundry Line/Coastal collection. Yes, I know it says "things" as in plural... but I'm claiming artistic license and only listing one thing - YOU. *wink* I spritzed it with a little water and carefully crunched it up to get the creased effect and allowed to dry. Then I spritzed with Pearl Glimmer Mist for the sparklies.

Some other details - the butterfly is from one of the Curio papers. I painted it with Rock Candy Distress Crackle Paint, dried, cut out and inked the edges with Distress ink. The antennae are hand made with a piece of black wire, dried glue and black paint. The Scrabble tile edges were roughed up with a nail file and consoled with a walnut ink-stained chunk of foam.

Card Recipe
Thanks so much for visiting! I hope we can inspire you throughout the week to join our challenge before January 31st.

Cheers,
Susan

Monday, December 20, 2010

Tilda Swirls with Gems

Well hello, there! It's Monday and the last Monday before Christmas. Er, not significant in general, but it just means I've been running around like a crazy person trying to find the "perfect gift" for my husband. We replaced a couple of kitchen appliances last month and that was going to be our Christmas. Of course, neither of us can go without presents under the tree. :) So, I'm scouring the antique stores for the perfect gift. No luck yet! *sigh*

So this week the Beary Scrap design team girls are showing examples of our current challenge theme - use pearls or gems. Here's my sample:


The paper is Echo Park's "Wintertime" line. EP is doing cool things with paper - they've reduced some of their designs to fit 4 different ones on a 12 x 12 sheet. The background paper here is actually a mini version of the "Flurry" design. The full size "Flurry" is used on the envelope box (see below). Check out the Wintertime line at TBS to see what I'm on about. This mini "Flurry" can be found on the back side of 12x12 "Damask". The middle panel is full-size "Snow", and the top layer - right behind Tilda - is on of the journaling cards enhanced with Stickles. All of the blue layers are "Blizzard Blue".

Darling Tilda is made up of a couple of layers, with loads of Stickles to accent. Her lantern is includes Glossy Accents in the "glass" panels, and her mittens and socks are covered in fuzzy white flock.


I edged the plain white flower with Distress Ink in Weathered Wood and Star Dust Stickles. All the flowers were spritzed with Pearl Glimmer Mist and dotted with the same Stickles.


Here's a view of the inside panel - I enhanced the swirl and snowflake design in the paper with Stickles... I can't stop with the sparkle!


And here's the whole kit and kaboodle. I used another journaling card for the name plate on the front, with a little Stickles on these snowflakes also.


Card Recipe
Thanks for visiting us today! There's still TONS of time to enter our current Beary Sweet Challenge #16 - Pearls or Gems. It doesn't close until 12/31, so I hope to see you there!

Cheers,
Susan

Monday, December 13, 2010

Woodland Tilda In A Sketch

Hello friends! It's such a busy season - I hope you found a few moments of sanity! Husband and I went on a Christmas House Tour and had a great time! I'm late writing this post so I'll get to the "good stuff". *wink*

I have another sample from our cool Beary Sweet Challenge sketch. The entry deadline is tomorrow night so there's still time to whip up a fabulous project and enter. You could win $20 gift voucher from The Beary Scrap!


Card Recipe

Click the sketch to go straight to our challenge. Thanks for playing!

Cheers,
Susan

Monday, December 6, 2010

Snow Hugs and a Layering Tutorial

Hello dear friends! I hope you had a great weekend. We had a crazy busy one and as I write this Sunday night I am exhausted. (But in a good way!) As you read this Monday, it is a new day with new challenges and new crafty projects to conquer!

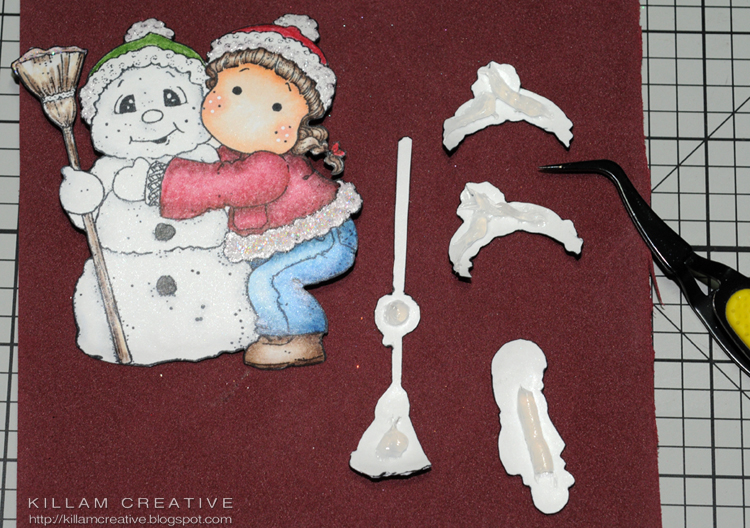
Today I am sharing my layering technique. It is now just about the only way I can make a stamped image "work" for me. When I look at new stamps or digital images I automatically start layering them in my mind. :)

Ok, so here is my card based on our current Beary Sweet Sketch Challenge. The design team will take it a little further this week and add die cuts to our cards. You don't have to have a die cut in your challenge entry, just be sure to follow our simple rules and enter your project by the end of the day on December 14th. You could win $20 gift voucher from The Beary Scrap!


Don't you just love these Bo Bunny "Midnight Frost" papers? Oh my goodness, I am in love! I've added loads of texture with embossing folders and used embellishments from the Midnight Frost collection. I'll add all the "card ingredient" details after the tutorial. This layering takes a lot of patience, and if you choose not to tackle it I hope you can find something useful for your projects! Thanks for looking. :)

Susan's Layering Tutorial


Step 1: Materials
  • Stamped images - I usually have 3
  • Layering plan - see the top left
    • Layer 1 - base
    • Layer 2 - clothing, hats, Snowy's buttons
    • Layer 3 - broom with handle, Tilda's left arm
  • Coloring medium - I use Copic markers and Prismacolor pencils
  • Sharp scissors - can't say enough about Cutter Bee - perfect!; also use Fiskars finger cutter and gray Helix mat for interior cuts
  • Black marker with brush tip - I love the Marvy Le Plume but haven't tried any others
  • 3D adhesive - I usually use silicone because I can control the thickness. I've also used Glue Dots with good results *and* I just learned of a new 3D adhesive that might replace my silicone. I'll let you know how it tests out when I get my hot little hands on it!
  • Round ended implement (in photo below) - can be paint brush handle or anything that has a small round end... this will make sense later. :)
  • Foam mat (in photo below) - cushions while you use the round ended implement

Step 2: Color, Cut and Edge

Left - right: Base, middle and top layers
As you can see here, I have colored,embellished and cut all my layers. It's important to let your liquid embellishments (Stickles, glossy Accents, etc) dry completely before edging with the black marker. Otherwise the marker will bleed into the Stickles or other medium you use. It's not pretty.


Carefully run the edge of the black brush marker along the edge of the image. Always come from behind because you *will* touch the image with the tip of the marker accidentally. On the back it's no big deal! The very tip of the marker will get into the small spots - just be careful to keep your pen moving; otherwise the ink will soak into the paper.

Step 4: Rounding the Edges


With gentle pressure, "draw" little circles around the edges to create a light curve. The small accessories have all been done. I have been using the round end of a paint brush handle and recently found this blue glass swizzle stick with a slightly larger ball on the end. In the Step 2 photo above, you can see both this swizzle stick and the paint brush handle; the larger ball makes smoother edges. The foam mat absorbs some of the pressure and allows for clean edges.

This Cryogen Irridescent paper shows the circles well:


Step 5: Stick 'Em Together


If you refer back to the original photo in Step 2, you'll see that my base layer is stamped on the patterned paper. We'll save that for last. Here I have squeezed out silicone on my top layers. I know how much to put on so it doesn't ooze out, but I suggest you start with the less-is-more philosophy and add more for more height as you become more familiar with it. Cleaning the oozing parts is messy and you have to be fast.

I use tweezers to apply the layers *very carefully*. You may need to put a small amount of pressure to align the parts and give the adhesive a chance to grab. I will fiddle with the pieces for a minute or two with slight pressure at all times to make sure my lines match up.

Here are those two layers. (The Cryogen paper is really reflecting the light!)


Step 6: Add the Final Layer


The layer stamped onto patterned paper includes the original snow outline at the bottom. I've filled it in with puffy snow stuff and then dotted the dry snow stuff with Stickles Star Dust. From here, you can finish the card as you like!


Thanks so much for reading through this tutorial. I hope it inspires your images to pop off the page! If you have any questions please feel free to email me. I will do my best to help you out!

Card Recipe
Wow, that's it. :) I hope this is useful to you! Hey, there's plenty of time to give this technique a whirl and enter it into our Beary Sweet Sketch Challenge. I would LOVE to see your layered projects!

Cheers,
Susan

Monday, November 15, 2010

Holly Jolly St. Nick

Hello hello blogging friends! i hope you had a spectacular weekend in your neck of the woods. Husband and I visited a dog show so we could stare at all the beautiful Dobe Boys and Girls. Ours runs more toward the Dobe Goof side of the breed family, and we love every bit of him. It is nice to see the ladies and gents, though. *wink*

Today kicks off a new Beary Sweet Challenge, and our theme is Anything Goes! Haha - I love this kind of challenge since it allows me complete freedom. Of course, this was a no-brainer for me since I started designing this card in my head waaay back when I first got my mitts on the My Mind's Eye Holly Jolly papers. With this challenge I was finally able to use it.


Santa is too delicious to be *just* a background element, don'tcha think? I had 2 of the same sheets and cut one Santa out. I painted him with Distress Crackle paint and layered him onto the second. Oh, I also I lightly inked the cut-out edges before painting with the crackle. I used Stickles on the holly and berries in his hat, too.

Here's a little note about Stickles - I have both the "Christmas Red" and "Gold" but find that "Candy Cane" and "Diamond" are much more suitable. When compared side by side, the former seem too bright.

The delightful ribbon is new to The Beary Scrap and I *love* it! I used 2 strips and wove gold embroidery thread through the centers. It was a bit of a brainstorm, and I'm really happy it hit me. I have tons of embroidery thread from years (er... decades?) ago that I've never used. Now it will be put to a good use! Yay!

The tag and tag holder thingy are Tim Holtz... stay tuned for TH products at TBS. *verybiggrin* The holly leaves (edged in Diamond Stickles) and red gems are from stash.

Card Recipe
  • Paper: My Mind's Eye Holly Jolly "Jolly Old St. Nick"; Bazzill Basics Mud Pie and (Dark Green)
  • Medium: Colorbox Fluid Chalk Ink in Chestnut Roan; Stickles in Diamond, Candy Cane, Green; Distress Crackle Paint in Rock Candy
  • Embellishments: Lace (available soon on the website); Embroidery floss, holly leaves, gems from stash
  • Adhesive: Scor-Tape, sewing machine
Thank you *so* much for visiting us today! We hope you join our Anything Goes challenge - we'd love to see your projects!

Cheers,
Susan

Monday, November 8, 2010

Sketch: Thankful For You

Hello friends! Hope you had a great weekend. We had a little family gathering to celebrate Grandma's 89th birthday. Now my wonderful in-laws are visiting and doing a little granddog sitting while Husband and I have a wee midweek fling in Philadelphia. *grin*

This week the design team is using the BSC #13 sketch with a little added challenge just for us: Apple, Pear, Pumpkin. This is open to interpretation and could be the foods themselves, their colors, or a combination of the two. Or even something I can't think of right now. :) See? It's all open to interpretation *and* imagination... 

I had a little problem at first... 'specially since I'm dying to use my new Christmas papers which have nothing to do with apples, pears or pumpkins. I poked around my paper bins and found the awesome Pink Paislee 365°. Of course, it's absolutely perfect so I opted for "sketch plus colors".


You'll notice I barely layered on this one. *gasp* I was unsure about a green dress so I figured I'd try it on the bottom layer first. (Normally I don't completely color the bottom layer - just the edges.) It turned out so well that I decided to use it.

Card Recipe
  • Stamp - Magnolia
  • Paper - Bazzill Basics in Mud Pie; Pink Paislee 365° 6x6 pad and "Be Free" (stripes) in 12x12
  • Medium - Copic E0000, E01, E11 for skin; Prismacolor pencils with OMS; Colorbox Fluid Chalk in Chestnut Roan and Creamy Brown; Stickles Crystal and Diamond; Distress Stickles in Spiced Marmalade
  • Embellishments - Kaisercraft Pearls in Snow; May Arts Crocheted Lace (brand new in store - call to order); Satin ribbon (large and woven into lace) from stash; ticket - my design and Kimm's sentiment (thanks a bunch!)
  • Tools - Scor-Pal; Cuttlebug Embossing Folders
  • Adhesives - Scor-Tape and 1/8" Glue Dots
Hope you can find inspiration from this... and while you're feeling so inspired *grin*, please join our Beary Sweet Sketch Challenge! It's going on now through November 14th. See you there!

Cheers,
Susan

Monday, November 1, 2010

Birthday Girl

Hello! Hope your weekend was great! We had a bit of a warm spell Sunday and got tons of yard work done. Yay! Sunday night we were entertained by trick-or-treaters. We saw some really fun costumes and absolutely adorable wee ones!

Here is my card based on the sketch challenge that starts today - it's made for a friends granddaughter.


Card Recipe
  • Stamp: Kenny K
  • Paper: Bazzill Mocha Divine and Guacamole; Basic Grey Kioshi
  • Medium: Copic Sketch markers for skin tones; Stickles Lime Green, Crystal, Star Dust, Milled Lavender; Chestnut Zing! Embossing Powder; Prismacolor pencils
  • Embellishments: Mulberry Roses; Lace, pins and ticket from stash
  • Adhesives: Scor-Tape and Glue Dots
Thanks for visiting!

Cheers,
Susan

Monday, October 18, 2010

I Vant To Spritz Your Paper

Hello hello! It's Monday, and you know what *that* means... It's me again, here to show off my Beary Sweet Challenge #12-inspired sample. The challenge is to use misting on your project, and I've Glimmer Mist'd the heck outta Dracula Edwin. No, it's not garlic-flavored Glimmer Mist! I'd like to keep this little cutie around for a while, but he's already spoken for. *sigh*


I did "the usual" with my pearl Glimmer Mist - spritzed the flowers (except the velvet Petaloo), black branches and vintage vampire fang tag. The best part of my misting, though, is the dry-embossed coffin - I dipped a teeny tiny paint brush into the Glimmer Mist bottle and painted the embossing! How cool is that?! I also painted Edwin's bow tie, purple cape trim and shoe strings. I really like the effect and definitely plan to use it with other mist colors.


Here is a glimpse of the easel flap. Inside is a panel for Happy Halloween greetings.


Card Recipe
Thanks for stopping in today! All week you'll find inspiration for our current Beary Sweet Challenge on "Misting". You can use any kind of misting embellishments - even handmade ones. Come join us for your chance at a $20 gift voucher to The Beary Scrap!

Cheers,
Susan

Monday, October 11, 2010

Getting Krafty!

Hello friends! Today I'm bringing you a card made with kraft paper and a little Glimmer Mist. I've really enjoyed all the Halloween-theme projects lately, so I'm at it again. Click HERE for the current Beary Sweet Challenge - it's a fun sketch!

So, here's my spooky "kraftiness". I used My Mind's Eye Haunted papers as well as a kraft tag.The image is a vintage find from The Graphics Fairy.


I used pearl Glimmer Mist on the base layer and the tag. It doesn't look nearly as cool in this photo as it does in person, so just take my word for it - It's cool! The spider web is embossed with clear embossing powder, and the vintage image was painted with Rock Candy Distress paint. Oh, and the white pearl pins were colored with a black Copic.


Card Recipe
Thanks for visiting today! You have a few days left to whip up a fun project for our Beary Sweet Sketch Challenge - come join us!

Cheers,
Susan
Related Posts with Thumbnails