Hello dear friends! I hope you had a great weekend. We had a crazy busy one and as I write this Sunday night I am exhausted. (But in a good way!) As you read this Monday, it is a new day with new challenges and new crafty projects to conquer!
Today I am sharing my layering technique. It is now just about the only way I can make a stamped image "work" for me. When I look at new stamps or digital images I automatically start layering them in my mind. :)
Ok, so here is my card based on our current
Beary Sweet Sketch Challenge. The design team will take it a little further this week and add
die cuts to our cards. You don't have to have a die cut in your challenge entry, just be sure to follow our simple rules and enter your project by the end of the day on December 14th. You could win $20 gift voucher from
The Beary Scrap!
Don't you just love these Bo Bunny "Midnight Frost" papers? Oh my goodness, I am in love! I've added loads of texture with embossing folders and used embellishments from the Midnight Frost collection. I'll add all the "card ingredient" details after the tutorial. This layering takes a lot of patience, and if you choose not to tackle it I hope you can find something useful for your projects! Thanks for looking. :)
Susan's Layering Tutorial
Step 1: Materials
- Stamped images - I usually have 3
- Layering plan - see the top left
- Layer 1 - base
- Layer 2 - clothing, hats, Snowy's buttons
- Layer 3 - broom with handle, Tilda's left arm
- Coloring medium - I use Copic markers and Prismacolor pencils
- Sharp scissors - can't say enough about Cutter Bee - perfect!; also use Fiskars finger cutter and gray Helix mat for interior cuts
- Black marker with brush tip - I love the Marvy Le Plume but haven't tried any others
- 3D adhesive - I usually use silicone because I can control the thickness. I've also used Glue Dots with good results *and* I just learned of a new 3D adhesive that might replace my silicone. I'll let you know how it tests out when I get my hot little hands on it!
- Round ended implement (in photo below) - can be paint brush handle or anything that has a small round end... this will make sense later. :)
- Foam mat (in photo below) - cushions while you use the round ended implement
Step 2: Color, Cut and Edge
 |
| Left - right: Base, middle and top layers |
As you can see here, I have colored,embellished and cut all my layers. It's important to let your liquid embellishments (Stickles, glossy Accents, etc) dry completely before edging with the black marker. Otherwise the marker will bleed into the Stickles or other medium you use. It's not pretty.
Carefully run the edge of the black brush marker along the edge of the image. Always come from behind because you *will* touch the image with the tip of the marker accidentally. On the back it's no big deal! The very tip of the marker will get into the small spots - just
be careful to keep your pen moving; otherwise the ink will soak into the paper.
Step 4: Rounding the Edges
With gentle pressure, "draw" little circles around the edges to create a light curve. The small accessories have all been done. I have been using the round end of a paint brush handle and recently found this blue glass swizzle stick with a slightly larger ball on the end. In the Step 2 photo above, you can see both this swizzle stick and the paint brush handle; the larger ball makes smoother edges. The foam mat absorbs some of the pressure and allows for clean edges.
This Cryogen Irridescent paper shows the circles well:
Step 5: Stick 'Em Together
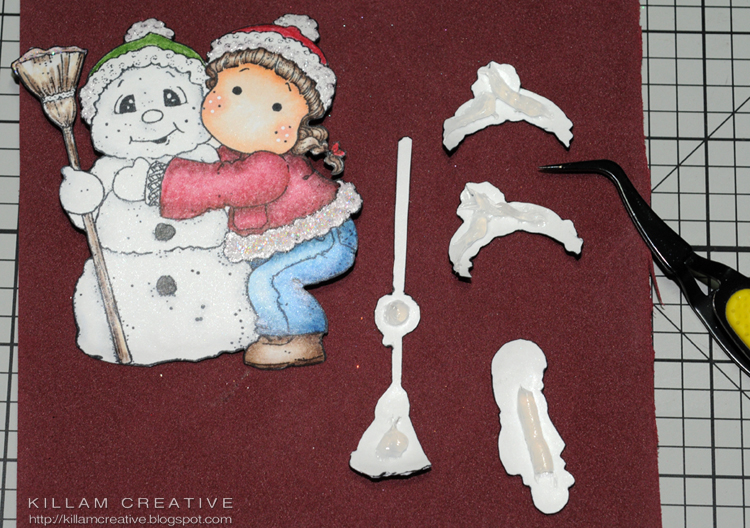
If you refer back to the original photo in Step 2, you'll see that my base layer is stamped on the patterned paper. We'll save that for last. Here I have squeezed out silicone on my top layers. I know how much to put on so it doesn't ooze out, but I suggest you start with the less-is-more philosophy and add more for more height as you become more familiar with it. Cleaning the oozing parts is messy and you have to be fast.
I use tweezers to apply the layers *very carefully*. You may need to put a small amount of pressure to align the parts and give the adhesive a chance to grab. I will fiddle with the pieces for a minute or two with slight pressure at all times to make sure my lines match up.
Here are those two layers. (The Cryogen paper is really reflecting the light!)
Step 6: Add the Final Layer
The layer stamped onto patterned paper includes the original snow outline at the bottom. I've filled it in with puffy snow stuff and then dotted the dry snow stuff with Stickles Star Dust. From here, you can finish the card as you like!
Thanks so much for reading through this tutorial. I hope it inspires your images to pop off the page! If you have any questions please feel free to
email me. I will do my best to help you out!
Card Recipe
Wow, that's it. :) I hope this is useful to you! Hey, there's plenty of time to give this technique a whirl and enter it into our
Beary Sweet Sketch Challenge. I would LOVE to see your layered projects!
Cheers,
Susan

 It's the last day of the month, which also means it's the final day for our nature theme at the Beary Scrap. We hope you have had fun and been inspired.